Golden Phelps

It’s summer and trees are heavy with stone fruits. Nectarines, freckled with yellow, orange and red, drip with abundant juice. Peaches, heavy and fuzzy like an animal, feel alive in your hand. Plums—purple, ruby and gold—are so ripe they glisten like translucent jewels.

With fruit this good, it’s hard not to want to buy a lot. Problem is, what to do with it all? Cobblers and crisps are a good option, but this summer we’ve probably eaten more than our share. I’m ready for something different. Why not a great summer fruit cocktail?

The following cocktail was inspired by one the US’s greatest, food-loving Olympians, Michael Phelps.

The Golden Phelps

Six leaves of purple basil
1 ripe plum, seeds removed and quartered
1 orange, juiced (reserve half of juice for the next cocktail!)
Splash of simple syrup
2 pieces of candied ginger, sliced
1 ounce dark rum
1 ounce light rum

Add the basil leaves in a cocktail shaker and muddle for 2 seconds to release the herb’s oils. Add the plum and one sliced piece of candied ginger. Continue to muddle. Fill shaker with ice. Add juice of the orange, simple syrup and rums. Shake. Taste for balance. Add more simple syrup or orange juice if needed.

Strain and pour over ice, leaving room at the top for adding pieces of muddled fruit and basil to glass. Garnish with candied ginger and basil.

Dive in and enjoy!

A dish with Alice Waters

Nectarine and Blueberry Crisp
There’s something so wonderful about cooking from a recipe. By following the directions, ingredient for ingredient, you are, in a sense, channeling the culinary spirit of the chef that created the dish. When the dish is complete and you sample the flavors, you are able to take an objective view of the dish. You can marvel at the ideas that brought those singular flavors together. You may note the subtlety of flavor or the unexpected abundance of it. By cooking dishes created by the masters, you begin to understand the inspirations of a Chef from the inside out.

Last night, in preparation of returning my many Alice Water’s cookbooks to the library, I made simple dessert—based on an amalgam of two recipes and what ingredients I had on hand. Some of the adjustments were mine, but the style of the dish is all Alice.

My first bite of this semi-sweet, rustic crisp made me feel like I was enjoying a dessert that Alice Waters and Lindsay Shere had made especially for me.

Nectarine and Blueberry Crisp
Adapted from the Chez Panisse Café Cookbook and Chez Panisse Fruit

½ cup almonds
1 cup all-purpose flour
3 tablespoons brown sugar
2 tablespoons granulated sugar
¼ teaspoon ground cinnamon
a pinch of salt
6 tablespoons unsalted butter

5 ripe nectarines, pitted and cut into 1 inch pieces
1 cup blueberries
¼ cup sugar
3 tablespoons unbleached flour
zest of one lemon, chopped fine
1 tablespoon aged rum

For the Topping

Preheat oven to 375 F. Toast the almonds until they smell nutty and are slightly more brown, about 7 or 8 minutes. Chop the almonds to a medium to fine consistency. Combine the flour, the sugars, the salt and spice in a mixing bowl. Add the chilled butter in pieces and mix with your fingers until it becomes mealy. Add the nuts and mix until the flour mixture holds together when squeezed. Put aside. (The topping can be prepared up to a week in advance and refrigerated).

For the Crisp
Mix the fruit in a medium-sized bowl and then add the sugar. Taste and adjust for sweetness. (*Note, don’t over sugar the fruit—there’s something quite beautiful about a semi-sweet crisp. Don’t be afraid to let the fruit express itself in its truest form.) Dust the flour over the mixture and stir gently. Spoon the topping into a small cooking dish is just big enough to hold the fruit. Mound a small amount in the center of the dish. Then, gently add the crisp mixture on top. Lightly push the crumble on top of the fruit mixture.

Place a cookie sheet on the middle rack of the oven (to catch any overflow juices) and put the crisp dish on top. Bake in the oven for 40 to 50 minutes, or until the top is lightly browned and the fruit juices are thickened and bubbling. The delicious smell of baked fruit will help you know when it’s close to being ready.

Serve with rum flavored whipped cream or vanilla ice cream. Finish the ice cream with a sprinkle of Maldon sea salt.

Nectarine and Blueberry Crisp

Save your pennies for dinner: go to the library


Photo from: elevenfortyfive.com

Every penny counts when you’re trying to cover the bills, fill up the gas tank, pay down credit card debt and still have a little coin to invest in a fancy meal now and then.

So, in the effort to save some cash I’m cutting a lot of corners. I cook at home for almost every meal. I’m the Iron Chef of leftovers. I stay away from gourmet delis, wine shops, cooking supply stores, bookstores and fancy restaurant row. I skip the coffee shop and drink one (free!) cappuccino while I’m working at the restaurant. I walk to most my errands.

And, in another foodie, cash-preservation step, I’m not buying ANY cookbooks. Instead, I’m raiding the local Los Angeles Public library for every great cookbook they have.

I love the library

So before you run over to your local library, just keep one thing in mind: If you live in Los Angeles, don’t even try to take out anything by Alice Waters or Thomas Keller for the next month or so. I’ve got all of the Keller and Waters’ cookbooks. According to my library account status, I’ve got these babies for another three weeks.

Thanks to the ticking clock of the library book due dates, I’m extremely motivated to read through all of my borrowed cookbooks. For the first time really, I’m truly reading cookbooks. I’m skimming the pictures and studying the elegant essays and personal pieces these two great chefs offer in all of their books. Quite honestly, reading cookbooks feels like going to cooking school.

Boy, have I been learning a lot.

First off, Alice Waters’ Chez Panisse Fruit is AMAZING. If you shop at farmer’s markets or participate in a CSA, you should really get this book. Chez Panisse Fruit not only offers hundreds of amazing and sometimes very simple recipes, Waters takes the time to discuss the glories of every fruit featured in the book with her well researched introductory essays.

An Alice Waters Fun Fact:

* Did you know that apricot pits can be used for baking needs?

According to Alice in Chez Panisse Fruit, inside the pit is a kernel, called the noyaux. The noyaux can be used to flavor amaretti cookies, custards, ice cream and liquor. To remove the noyaux, simply roast the pit at 350 F for 10 to 15 minutes and crack them open. It should be noted that the noyaux has a toxic enzyme that is destroyed by heat: so be sure to roast the center kernel again for a few minutes to make sure it is safe to consume.

I’ve really enjoyed reading and cooking from the Chez Panisse Café Cookbook a great deal. Alice’s recipes feature the most casual dishes of Chez Panisse and allow the home chef easy access to cooking in the style of one of America’s most respected and ground breaking Cal-French restaurants.

If you want an example of a great and easy to make dish, just check out my previous post about Prosciutto wrapped scallops.

from ruhlman.com

After hearing that Thomas Keller would be returning to Los Angeles to open a new Bouchon, I got very excited to start reading up on this French Laundry chef. His books are beautiful to look at and have plenty of personal stories to bring the reader into his thought processes behind all of his restaurants.

Thomas Keller’s Bouchon is a beautifully photographed book that’s chocked full of wonderful essays and insights into French bistro fare. Though author Michael Ruhlman’s writing is incredibly tight, the size and weight of Bouchon makes it better suited as a culinary, coffee table book than a functional cookbook. That being said, the recipes in this book are not as daunting as the haute cuisine of the French Laundry. The bistro fare, though it may seem simple, requires thoughtful and specific recipes. The authors and chefs come together to describe the steps of preparation with research to back it up. Reading Bouchon gave me the impression that maybe there could be a handful of dishes I could make without making a fool of myself.

A Thomas Keller Fun Fact:

* Thomas Keller’s first real teacher in French cooking was a Frenchman named Roland Henin. It was in Henin’s Rhode Island restaurant that Keller learned one of his first, and memorable cooking lessons: how to dress a salad.

According to Keller:

He would salt it, then put on the oil to coat the lettuce and protect it from the acid, and then he would add the acid. He would never combine the two then pour them on: vinegar was the seasoning element. What made watching him exciting was the anticipated joy of eating that salad, the richness of the oil, the sparks of vinegar that would come through.

Cooking from a library book may be a scary idea for anyone like me that has a difficult time keeping prepped ingredients from ruining one’s own personal cookbook pages. I do my best to keep these borrowed books clean when I take them into the kitchen with me. Though I’ve managed to splatter just an eensty-teeny bit of oil on one page of Alice Waters’ Café Cookbook, I notice I’m not alone in the occasional spots and smudges on the pages. Clearly, I’m not the only one trying to save some coin for a really great meal.

Art of the bar


Maybe it’s because I grew up in a sea-side village in Massachusetts, but fresh fruit wasn’t something I was accustomed to. Fresh fish, yes. But fresh fruit? Ah, no.

Exotic bananas, kiwis and citrus fruits could be bought for an inflated price at any of the major New England based grocery stores, but they were purchased knowing full well they were treasures from far away. Crisp apples, juicy pears, fat strawberries, tart blueberries, soft raspberries, mouth watering melons and delicate concord grapes were mine, but only for the fleeting dog days of summer and cool nights of fall.

As a bartender in Cambridge, Mass., I made plenty of cocktails. I made the classics (Martinis, margaritas, and simple mixed concoctions) with brand name liquors with sour mix from a plastic bottle, canned pineapple juice, coconut mix, orange juice from Florida, or soda. Fruit, for an east coast bartender like me, was never a featured element. Lime, orange and lemon were visual flourishes, only to be used as a garnish.

Calfornia Flavors

It wasn’t until I moved to California that I tasted a fresh cocktail. My understanding of what a drink could be was changed forever when I tasted my first handmade Mojito. I was floored (literally) by the fresh flavors of lime and mint and the balance of acidity and sweetness.

Suddenly, I understood that cocktails shouldn’t be a barely disguised alcohol delivery system–it should be a delicious, refreshing, appetite enticement made with as much care as a diner’s first course.

During my time working in California restaurants, I learned how to make cocktails with hand-squeezed citrus, freshly muddled herbs and specialty liquors and perfected the art of balancing sweetness and acidity. Then, when I starting running a restaurant that specialized in hand made cocktails, I was free to show my creativity behind the bar and create amazing cocktails from fresh, seasonal produce for the restaurant. It was, by far, the most fun and rewarding part of my job.

Though popping open a ready-to-drink bottle of wine can be undeniably easy, making a great cocktail at home doesn’t have to be difficult.

Creating a cocktail

Here are a few simple rules to follow when making a fresh cocktail:

1) Use great, fresh ingredients
Fresh fruit and citrus should be juicy. If you discover you’ve purchased “dry fruit” (fruit that just isn’t giving up its juice easily) either toss the fruit or, if you don’t want to go back to the store, double up on the amount of fruit you use in order to get the correct flavor.

2) Maintain balance
Acidity and sweetness must always be in balance with each other, as well as the alcohol. Don’t let one ingredient hog the limelight. Everything in well-crafted drink, must perform together, in unison.

3) Taste
Don’t be afraid to take a little taste of what you’re making to make sure it’s right. A great bartender, like a chef, must always taste in order to maintain consistency.

4) Experiment
Don’t be afraid to try something new. Buy fresh fruit and taste them. What flavors would go well with it? What does it remind you of? A favorite pie? A childhood popsicle? These trusted flavors can lead you and your cocktail making to great places.

The following is a recipe I created this weekend after tasting the sweetness of a ripe pluot, fresh from the market.

Dapple dandy
Half plum, half apricot, the pluot’s intense sweetness and playful acidity is the perfect center point for this refreshing summer time drink.

1 ripe pluot, cut into thick wedges (a ripe plum could work, also, though you may need to add more lime juice to balance the flavors)
Juice of one lime
Simple syrup* to taste (about 2-4 tablespoons)
1/8 tsp. almond extract
1-1.5 ounces premium vodka
Ice

Muddle the pluot wedges (in either a cocktail shaker or pint glass) until most of the juice is released. Add the juice of one lime and almond extract. Fill shaker with ice. Add vodka and shake to mix well. Taste. Pour into glass and serve.

Enjoy!

*Making your own simple syrup is easy. It’s just one part sugar to one part water. Boil water, add sugar. Take off heat when sugar dissolves. Let cool. There’s a simple, step by step recipe here.

Culinary Aha! moment

get over fear of baking
Not all sugars and measurements are the same

Sometimes life offers up little discoveries that remind you to stay sharp and be humble. You learn to swim after fearing it all your life. You read a book you always thought was “too deep” for you. You meet a stranger that inspires a courageous journey. You see stars in the sky and realize how small you are. You observe a piece of artwork that inspires a new idea. You taste a Madeline and suddenly the glories of youth are remembered.

These shifts in perspective, be it big or small, can redirect your life in an instant. Oprah calls this flash of understanding an “Aha!” moment. These life changing moments certainly do have a Sherlock Holmes-esque “A ha!” or “Egads!” quality to them.

My Aha! moment

I had one of those eye-opening moments a few days ago during a conversation with a long time friend, Anne, over lunch. She’s a former model turned pastry chef (what a great combination, right?) and is one of the most honest and real people I know in Los Angeles. So not only can I talk to this smart and lovely woman about life, but I can also ask her all sorts of questions about baking. Maybe too many questions about baking. But she doesn’t seem to mind it. Considering my fear of making desserts, I think Anne is the only one that will teach me to get over it. ASAP.

So, back to the “Aha” moment. I was in the thick of asking for Anne’s culinary perspective on a cobbler recipe I was perfecting, when I asked her how she measured out her recipes.

“Kitchen scale,” she said. “Though, I have a few of my early recipes in cup measurements.”

Damn, I thought. I really do have to go out and by a kitchen scale. With the cost of gas weighing heavily on my wallet, I asked, “Is there a way to make sure to get perfect measurements from my measuring cups?”

Without missing a beat Anne answered. “Yeah. That’s easy. Just scoop and level the ingredient out.”

I immediately pictured my big glass measuring cup filled half way with flour.

“Yeah, but what if the recipe calls for 2 cups and your measuring cup holds 4? How do you level it out then? By punching it down?”

Anne gave me a Kung-fu master smile. “You’re using a liquid measure to measure dry ingredients, Brooke. You need dry measuring cups to measure flour.”

CUE SOUND: record scratching

AHA! Egads! THERE ARE TWO KINDS OF MEASUREMENTS?!!

No wonder my baking skills aren’t great. I didn’t know how to measure my ingredients!

Dry measurements vs. liquid measurements

If I had paid attention in my high school science class, I would have known that liquids and dry products measure differently. In the interest of anyone else that may be as in the dark about measurements as I am, I offer this quick and easy lesson.

In baking, accuracy is one of the most important skills for the cook. Follow recipes closely and use the correct measuring tools and accurate measurements. Using dry measuring cups allows for proper leveling and volume.

DRY MEASUREMENTS
Dry measurements should be put in individually portioned (nestled) dry measuring cups (or a professional grade portion controlled measuring cup). Ingredients are then leveled off the top with the back of a knife or spatula. This website strongly recommends using a scoop to fill the measuring cup with dry ingredients and not to use the measuring cup itself. Otherwise, your measurements will be off.

SPOON MEASUREMENTS
Despite what my mother told me about using kitchen spoons, measuring spoons are necessary in creating accurate measurements in baking. Measuring spoons should offer a wide range of sizes including 1/8 teaspoon, 1/4 teaspoon, 1/2 teaspoon, 1 teaspoon, and 1 tablespoon.


LIQUID MEASUREMENTS

Liquid measuring cups usually come in 2 or 4 cup containers which allow for pouring. Liquid measuring cups allow room at the top of the container for the curvature (meniscus) of the liquid.

This helpful website gives conversions for national and international kitchen measurements.

Aha moments can be a little unnerving at first, but in the end they can make you a better person, or in my case, a better cook.

Say Cheese


For some people, cheese is just a food. For others, it’s an addictive substance.

Cheese lovers hover at cheese counters and unconsciously paw at the glass that keeps them from aromatic wedges of Parmesan, stinky rounds of French triple creams and pungent British blues. They’re the people that actually eat the cheese samples at Whole Foods. Normal people may go to a cheese shop and ask to speak to the cheesemonger–but cheese addicts go to cheese counter and ask for “the pusher”.

I am one of those people. My name is Brooke and I have a cheese problem.

Confessions of a Cheese Lover

It’s sad how much money I’ve spent on goat, sheep and cow’s milk cheeses. With the ridiculous cost of gas, I’d rather go easy on the environment (and my cheese buying budget) and walk a mile to the store and back, just so I can get a great wedge of cheese. Considering my commitment to the creamy stuff, I recently decided I should learn how to make it. Maybe not a great idea for a cheese lover (addict) like myself to do, but besides being a great learning experience, I could save some serious money while I’m at it.

Maybe making my own cheese a bad idea for someone like me. But after getting my first taste of home made cheese I have to say, how can something so good be bad?

After doing some tentative research on-line that offered me disappointing results, I stumbled upon some chefs making cheese at the restaurant I work at. Low and behold, in my very own place of culinary work, I learned that cheese making didn’t need to be difficult. At all.

Thanks to the kind, smart and talented chefs at my restaurant, they answered all of my questions and tolerated my obsessive observation of the cheese making process so that I could come to you with some great tips and one of the easiest cheese making recipes around! Ladies and gentlemen, I give you Greek yogurt cheese!


Greek Yogurt Cheese
(makes approx. 12 oz. of cheese)
*This cheese would also be great with the addition of lavender or herbs such as thyme, dill or oregano.

Ingredients:

1 regular sized (32 oz.) container of Greek Yogurt
1 lemon (to be zested and then squeezed)
Kosher salt
Cheesecloth (cut into 3-4 18-20” pieces)
Kitchen twine
Tall prep container


Pour the container of Greek yogurt into a medium sized bowl. Mix into the yogurt the zest and juice of one lemon.

Add salt to taste. 2-3 tablespoons should do.

Line a second bowl with the cheesecloth, being careful to leave the sides hanging out over the side.

Ladle the cheese mixture into the cheesecloth-lined bowl. Bring the tops of the cheesecloth together, creating a semi-tight sack or “purse”. You will notice clear liquid dripping from the sack already. The cheese making process has begun! Though this is a very exciting step, be sure not to get too eager to remove moisture from the yogurt and squeeze the purse too tightly. Otherwise you’ll see yogurt oozing out through the cheesecloth, not just liquid. Tie the top of the purse off with kitchen twine.

Wrap the loose portion of the purse (use twine if you need to) to the neck of a wooden kitchen spoon or ladle. Set the spoon across the top of your prep container (or, if your prep container is too shallow—set it between two tall containers and let the moisture fall into a short bowl).

Make sure that the bottom of the cheesecloth purse doesn’t touch the bottom of the container! Keep in refrigerator for at least 24 hours. The cheese will feel firm, like a goat cheese when it is done. Remove from cheesecloth. Serve! The texture of the cheese should be that of a goat or sheeps’ milk cheese. The flavor, however, is incredibly refreshing, zesty (from the citrus) and deliciously creamy. You won’t want to waste one bit of this cheese!

My husband and I vow to make this cheese every month and skip the cheese counter.

Simple serving suggestions: Serve on crackers with Italian flat parsley and thinly sliced lemons.

Or toasted bread with tomato, parsley and prosciutto.

Next up, the dish that inspired home made Greek Yogurt Cheese!

Don't fear the egg


The beauty of an egg is its simplicity–simplicity embodied in its elegant shape and intelligent design. Inside the egg, there is a delicate liquid dance of light and dark—a golden orb of yolk suspended in a viscous, protective fluid. Combined, these elements are powerful enough to support a life. In the hands of skilled chef, the egg is the center point of a meal or the central ingredient behind rich sauces or a delicate soufflé.

Up until recently, I feared the egg.

My fear wasn’t based on science, agricultural politics, or some kind of bizarre food phobia. No, my fear was based on the power of one single cooked egg to confirm (or disprove, in my case) my level of skill in the kitchen.

If I can conquer all sorts of culinary challenges, my thought process would go, how is it an EGG can thwart me?

It an embarrassing thing for a food writer to admit, being afraid of cooking eggs. I mean, after years of cooking, brining, roasting, fish gutting and baking, I should have long ago gotten over this fear of an egg-centered breakfast. Granted, I kept my fear in the closet for years after mastering egg poaching, just so I could continue on living like a perfectly normal, food-obsessed woman in the kitchen. And now, after years of quiet observing and coaching (Thanks husband!), I am now happy to report I can now cook scrambled and sunny-side up eggs as well as fluffy omelets without breaking into a sort of culinary panic attack.

But for anyone like me that still may secretly fear they might undo any culinary status they’ve built up with friends and family by making a terrible egg dish, I offer the following fool proof dish that will wow any breakfast guest. This, by the way, also makes a great lunch when the cabinets and fridge are nearly bare. Oh, and feel free to increase the recipe, depending on how many guests you plan to impress!


EGGS AL FORNO
Serves one

One monkey dish (small, 5 to 6” cassarole dish with “ears”)
One egg (or two if you like)
1 piece of bread from a rustic loaf (or baguette), cut to fit the dish
1 handful of a good cheese (fontina, perrano, or any medium bodied cheese), cubed
1 generous sprinkling of freshly grated parmesean (1/3 cup)
a healthy pinch of chopped sweet onion (or green onion, or chives)
a touch of olive oil (1 teaspoon)
salt and pepper

Preheat the oven to piping hot 500 degrees. Put the piece of bread into the dish. Drizzle with a little olive oil. Surround the bread with the cheese cubes and parmesean. Add a healthy pinch of sweet onion around the bread. Crack the egg and lay it on top of the bread. Season with salt and pepper. Grate a tiny bit more parmesan over the egg. Bake on the middle rack of the oven for 7 minutes, or until done.

Be very careful taking the baking dish from the oven! Place a folded cloth napkin on your plate before serving. For bacon lovers, a piece of fried bacon on top would be a perfect way to garnish the dish!

How to gut a fish


There’s a certain amount of fearlessness required to do anything unfamiliar. Faith helps, especially when facing an impressively difficult task. Steve Martin, the well-known grey haired comedian/writer (“well excuuuuuuuse me!”) says in his recent memoir “Born Standing Up” that naivite is the single most important trait required for anyone about to do something truly difficult. Pure, bright-eyed innocence of what trials are awaiting them is what is needed in order to protect the individual “from knowing just how unsuited [they] are for what [they] are about to do.”

And so it is with prepping, gutting and eating a whole fish.

When it comes to cooking, you have to be a little fearless, a touch naïve, and full of faith that your efforts will result in something good—and hopefully—something really delicious. There’s only so much research you can do. Not every task has a clear set of rules. Sometimes you just have to wing it.

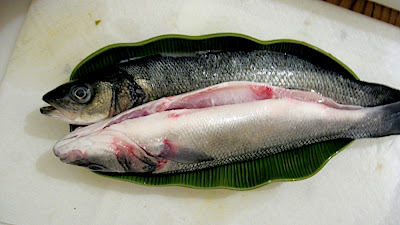
Which is exactly what I did last week when I went to the market and was dazzled by the beautiful, clear-eyed whole fish on display. I never hesitated selecting a pound of whole sardines and two glorious, whole branzino from the shaved ice. It didn’t matter I had never cleaned a fish myself. I had faith that I could figure it out.

In all my years of working in restaurants, I’ve seen hundreds of fish scaled, cleaned and filleted. I’ve watched cooks throw whole fish onto their cutting boards and deftly use their knives to slice through the skin to reveal the tangerine flesh of salmon and the milky white meat of snapper. I’ve noticed how the back of a knife could be used to peel scales from the delicate skin of the fish. I’ve heard the percussive thud of fish head after fish head, hitting the side of the rubber garbage bin. So when I got home with my fish I figured just how hard could cleaning a fish be?

Back home in the kitchen, I immediately went to work. I washed my hands, ripped open the fishmonger’s paper packages and admired my bounty. The fishes’ tiny eyes shone bright and their silvery scales glistened in the kitchen light. I marveled at their fresh, clean smell. When I was good and ready to say goodbye to the pristine natural state of the fish, I took out my Knife Skills book and scanned its pages for tips on gutting.

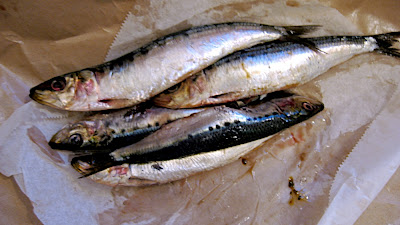
Plenty of information is to be had on how to fillet (the left handed and right handed versions are beautifully illustrated), but to my surprise, Knife Skills doesn’t see the need to mention the fish gutting step. Feeling up to the challenge, I took my one good chef’s knife and pointed its tip into the belly of the first sardine. The knife barely pierced the fish’s delicate flesh, indicating that I had learned my first valuable lesson in gutting a fish.

1) Sharpen your knife.

After a good once over with my knife sharpener, I was ready to slice into the belly of the sardine. It was simple enough, running the knife along the belly to reveal the center cavity. Inside, the contents were easy enough to remove with the gentle swipe of a finger.

Gutting the whole branzino (whole black bass), however, offered to be a tad more difficult. The branzino, though much more hearty and therefore easier to work with (i.e. was more forgiving to my novice gutting skills), required scaling. Going from memory, I used the back of my knife to lightly push the scales back and off the fish. As I washed the skin under the sink’s cold water, I felt the skin with my fingers to find what spots I missed.

When it came time to gut the fish, self-doubt began to creep in. My husband is a perceptive man (and also a fifteen year restaurant professional) and took the opportune moment to give me some sage words of advice gleaned from a former employer, Michael Cimarusti, the well known chef/owner of the sea-food driven restaurant Providence. “Michael used to say that gutting a fish is easy” Hans told me in practically a whisper. “The fish’s meat stays firm and while the rest just slides away.”

I took a deep breath, let my sharpened knife slide through the thin layer of skin. Once inside the internal cavity, the organs did just as Cimarusti said they would. The liver, stomach and kidneys slipped onto the cutting board without a struggle. I rinsed the cavity to make sure I had removed everything and nothing unnecessary remained.

2) Let the fish release its insides to you

Following a very simple recipe from Mario Batali’s Molto Mario cookbook, I lightly seasoned the inside and outside of the fish, drizzled it in olive oil, and cooked it for three minutes on each side under the broiler for a total of 12 minutes. When done, the meat is moist, sweet and unbelievably delicious.

Of course, the real adventure of preparing a whole fish begins when you eat it. There are no rules. Whole fish, like lobster, is an incredibly rustic meal that appeals to meat foragers and people who aren’t afraid to get a little messy at the dinner table. Fingers are good instruments to find the bones, but depending on your dining environment, eating with your hands isn’t always possible. Regardless, care must be taken when eating a whole fish. Remove as many bones as you can–in one grand, head to tail gesture is always fun—but be sure not to throw away the head! The cheeks are one of the most delicious parts of the fish!


Mario Batali’s recipe for Branzino alla Griglia:
Grilled whole black bass with onions, olives and red chard

Makes 4 servings
Two 2-pound black bass (branzino), cleaned and scaled
¼ cup plus 2 tablespoons Extra Virgin Olive Oil
1 large red onion, thinly sliced
1 cup Ligurian black olives. I used one jar of Mediterranean olives from Whole Foods
2 pounds red Swiss chard, *trimmed and cut into 1-inch wide ribbons.
Grated zest and juice of one lemon
Salt and freshly ground black pepper
½ cup olive paste
2 lemonds cut into 6 wedges (for serving)

*trim the leaves of the internal stalk of the chard but make sure to save these pieces for the recipe! To create 1 inch wide ribbons, roll the trimmed leaves up like a cigar and cut horizontally against the rolled up greens.

Preheat grill or broiler. Heat a 12-inch sauté pan over medium heat, and add ¼ cup of the olive oil. Add the onion and cook until wilted, about 2 minutes. Add the olives, chard, lemon zest and the juice. Toss until the chard is wilted, about 3 minutes. Season to taste with salt and pepper. Remove from heat and cover to keep warm.

Season the fish inside and out with salt and pepper. Brush with the remaining 2 tablespoons of olive oil. Place on grill or on a cooking sheet under the broiler for 3 minutes on each side, for a total of 12 to 15 minutes. Cook until cooked through yet still moist.

Just before serving, reheat the chard (if necessary). Place the
fish on a large serving platter, arrange the chard around the border, and serve immediately with the olive paste and lemon wedges along side.

A master comments…

After getting over a bit of performance anxiety, I brought my butternut squash dish to work to be critiqued by the chefs at the restaurant I worked at.  I did my best to appear cool and calm and slid the plastic to-go container holding the contents of my labors to the chef.

“Here’s that butternut squash dish I’ve been obsessing over,” I said with studied nonchalance. “Heat it up whenever you think you have the time.”

I started to walk away. Chef Bryant stopped me as I turned to leave.

“Hold up. We’re gonna eat it now.”

I quickly gave him my re-heating instructions and disappeared around a corner. I was hoping to see if Nancy Silverton, my boss and my culinary hero, was somewhere nearby. I scanned the back kitchen.  The only people I could find were the dishwashers and some cooks prepping clams.

For a moment I considered slicing off a portion of sizzling butternut squash and bubbling Pecorino and bringing it to her, but changed my mind.  I feared I’d look foolish or inconsiderate forcing a nugget of orange squash on the city’s most celebrated bread bakers. With just minutes before service, surely someone in charge would kill me for distracting Nancy.

So instead, I busied myself with preparing a frothy cappuccino. Anything to keep my hands busy and my eyes off the mouths of the chefs that were most likely eating my dish by now. I downed my caffeinated drink and returned to the floor of the Pizzeria.

One of the chefs, Joe, stopped me as I passed by. “ Hey–it’s good,” he said.

I stopped in my tracks. I couldn’t stem the rising of octaves in my voice. I practically sang a high-soprano “Really?”

“It could use a little salt. But it’s good.” He smiled. Continue reading “A master comments…”